Imagine stepping onto a pristine golf course, meticulously manicured with lush fairways and vibrant greens. Suddenly, you encounter an unsightly divot, a patch of turf torn from the ground, marring the otherwise impeccable surface. As a golfer, understanding how to fix a divot is not merely an act of course maintenance; it’s a responsibility to preserve the integrity of the game for you and fellow players. In this comprehensive guide, we delve into the intricacies of divot repair, empowering you to seamlessly restore the green and enhance your golfing experience.
.JPG)
Image: elconaccgrounds.blogspot.com
The Importance of Divot Repair
Divots are a natural consequence of golf, but their impact on the course can be significant if left unattended. Damaged turf can weaken the root system of the grass, increasing its susceptibility to disease. Moreover, unrepaired divots can create an uneven playing surface, affecting the trajectory of the ball and making it difficult for other golfers to predict its path. By promptly repairing divots, you not only contribute to the aesthetics of the course but also promote the health of the green, ensuring an enjoyable experience for yourself and others in the future.
Step-by-Step Guide to Divot Repair
Fixing a divot is a simple yet crucial task that can be performed with minimal tools. Here’s a step-by-step guide to restore the green to its original condition:
-
Locate the Divot: Identify the area on the green where the divot has been made. It’s typically a small, triangular-shaped patch of turf that has been removed.
-
Use a Divot Tool (or Nearby Object): Gently insert the prongs of a divot tool or a similar object (e.g., tee, pencil) into the ground along the edges of the divot.
-
Loosen the Soil: Carefully loosen the compacted soil beneath the divot by inserting the tool into the ground and moving it back and forth slightly. This aeration will allow the roots of the turf to access water and nutrients.
-
Replace the Divot: Take the removed divot and carefully place it back into the hole. Ensure that the grass blades are facing in the same direction as the surrounding turf.
-
Firmly Press: Using the divot tool or your fingers, firmly press around the edges of the replaced divot to ensure it’s securely in place. This will help the turf re-establish contact with the ground.
-
Smooth the Surface: Once the divot is replaced, use your foot or a tamper (if available) to gently smooth the repaired area. This will disguise the repair and prevent the patched turf from drying out.
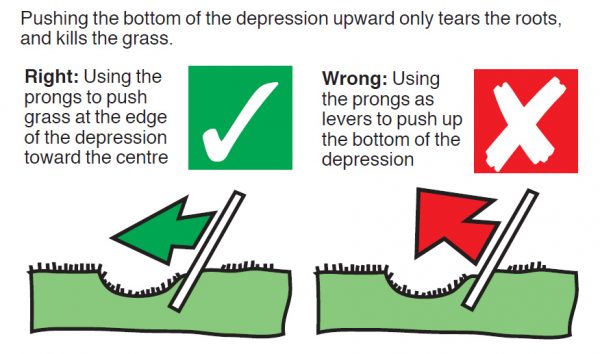
Image: reachthegreen.com
How To Fix A Divot On The Green
Additional Tips for Effective Divot Repair
-
Protect the Green: Always repair divots immediately after making them to prevent further damage.
-
Use Sand (Optional): For large divots, sprinkle a small amount of dry sand around the repaired area to enhance drainage and prevent moisture accumulation.
-
Avoid Overwatering: Excessive watering can hinder the recovery of the repaired turf. Water sparingly and only when necessary.
-
Educate Others: Share your knowledge of divot repair with fellow golfers to promote responsible behavior on the course.
By following these simple steps and embracing the best practices for divot repair, you become an ambassador for the preservation of the golf course. It’s a testament to your respect for the game and the shared responsibility of maintaining the integrity of the green for generations to come.
Remember, repairing divots is not a chore but an expression of sportsmanship, camaraderie, and a genuine love for the sport of golf. Embrace the opportunity to contribute to the beauty and vitality of the golf course, ensuring an unforgettable and enjoyable experience for yourself and others.
