Are you fed up with your malfunctioning shower head? Disheartened by its weak stream or unpredictable spray? If so, fear not! Replacing or repairing a broken shower head is a relatively simple task that can be accomplished with a few basic tools and a bit of know-how. In this comprehensive guide, we’ll walk you through the process step-by-step, empowering you to tackle this plumbing conundrum with confidence.

Image: jeopardylabs.com
Understanding Shower Heads: A Brief Overview
Before delving into the repair process, it’s essential to understand the different types of shower heads available and their distinct features. From traditional fixed models to handheld and multi-function heads, each type offers unique advantages and drawbacks. Understanding these variations will help you determine the best replacement option for your needs.
For instance, fixed shower heads are known for their simplicity and affordability, while handheld models provide greater flexibility and ease of use. Multi-function heads, on the other hand, offer a range of spray patterns and settings, catering to various showering preferences. By familiarizing yourself with these different types, you can make an informed decision that aligns with your specific requirements.
Fixing a Broken Shower Head: A Step-by-Step Guide
Now that you have a better understanding of shower heads, let’s delve into the process of repairing a broken one. Follow these steps carefully, and you’ll be enjoying a rejuvenating shower in no time.
1. Gather Your Tools
Before embarking on this repair adventure, gather the necessary tools: adjustable wrench or pliers, plumber’s tape, a replacement washer (if needed), and an optional shower head wrench. These essential tools will enable you to effectively remove the old shower head and install the new one without any hassle.
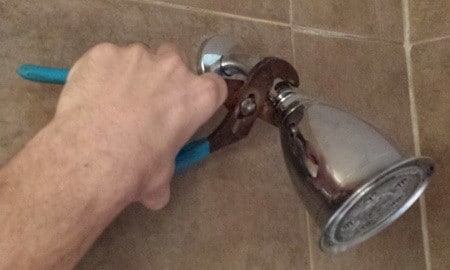
Image: removeandreplace.com
2. Shut Off the Water Supply
To prevent a deluge of water during the repair, it’s crucial to shut off the water supply. Locate the shut-off valves, which are typically situated under the sink or behind the toilet in your bathroom. Turn both the hot and cold water valves clockwise until they are fully closed.
3. Remove the Old Shower Head
Using your adjustable wrench or pliers, carefully unscrew the old shower head from the shower arm. If the shower head is particularly stubborn, you can gently wiggle it back and forth while applying pressure to loosen it. Exercise caution not to damage the shower arm or surrounding tiles.
4. Check for a Washer Replacement
Once the old shower head is removed, inspect the shower arm for the presence of a washer. This small rubber or plastic disc creates a watertight seal between the shower head and the arm. If the washer is worn or damaged, it’s highly recommended to replace it to prevent leaks.
5. Wrap the Shower Arm with Plumber’s Tape
Take a few wraps of plumber’s tape clockwise around the threads of the shower arm. This will help to create a watertight seal and prevent leaks when the new shower head is installed.
6. Install the New Shower Head
Screw the new shower head onto the shower arm by hand until it’s snug. Using your shower head wrench or pliers, tighten the shower head further, but avoid overtightening, as this could damage the shower head or the shower arm.
7. Turn on the Water and Check for Leaks
Slowly turn on both the hot and cold water valves to allow water to flow through the new shower head. Carefully inspect all connections for any leaks. If you notice any drips or leaks, tighten the connections further using your wrench or pliers until the leaks cease.
8. Adjust the Shower Head Position and Settings
Once the shower head is securely installed and leak-free, adjust its position and angle to achieve the desired spray pattern. Most shower heads allow for some degree of swiveling and tilting to accommodate your preferences. Additionally, if your new shower head features multiple spray settings, experiment with them to find the one that suits you best.
Replacing a Broken Shower Arm
If the problem lies not with the shower head but the shower arm itself, replacing it may be necessary. This process is slightly more complex than replacing the shower head alone:
1. Shut Off the Water Supply
As with the shower head repair, the first step is to shut off the water supply at the main valves.
2. Remove the Shower Arm Cap
Using a small flat-head screwdriver or a coin, carefully pry off the cap that covers the base of the shower arm.
3. Remove the Escutcheon Plate
Behind the cap, you’ll find an escutcheon plate. Remove it by unscrewing the screws holding it in place.
4. Unscrew the Shower Arm
Using an adjustable wrench, loosen the shower arm by turning it counterclockwise. Be cautious not to damage the wall or the shower valve.
5. Remove the Old Shower Arm
Gently pull the old shower arm straight out from the wall. It may be helpful to slightly wiggle the arm back and forth to loosen it.
6. Install the New Shower Arm
Apply a thin layer of plumber’s tape to the threads of the new shower arm and screw it into the wall by hand until it’s snug. Use your adjustable wrench to tighten it further, but avoid overtightening.
7. Reinstall the Escutcheon Plate and Cap
Place the escutcheon plate over the base of the shower arm and secure it with the screws. Finally, snap the cap back into place.
8. Turn on the Water and Check for Leaks
Gradually turn on the water supply and check for any leaks around the base of the shower arm. If you notice any leaks, tighten the connections further or apply additional plumber’s tape as needed.
How To Fix A Broken Shower Head
Conclusion
Fixing a broken shower head or replacing a faulty shower arm is a task that is within reach for most homeowners with a bit of patience and the right tools. By following the steps outlined in this comprehensive guide, you can save yourself the cost of hiring a plumber and restore your shower to its former glory. Remember, if you encounter any difficulties or have any concerns, don’t hesitate to seek professional assistance. With a little effort, your shower will be functioning perfectly, allowing you to enjoy a revitalizing and refreshing experience every time you step into the bathroom.
